After looking into the Brotli compression algorithm in a previous post, I decided to try installing it on my own server to see how it worked. I’m running a static site generated by Jekyll which is served from Nginx. My goals were to 1) get the server to serve Brotli compressed files, and 2) automate the compression process so I wouldn’t have to compress future files manually every time there was a change.
The process ended up being a little more involved than I expected, but I learned a lot along the way. In this post, I’ll share the steps in the hope that they might be helpful for others who are looking to do something similar.
What is Brotli?
Before jumping into the server configuration aspect of this, let’s do a quickl review. First, in case you’re wondering, what is Brotli, exactly? Named after a Swiss baked good, Brotli is a compression algorithm that Google released last year. Firefox has already started utilizing the algorithm, and Chrome is scheduled to begin doing so soon (it’s currently in the v49 Canary release).
For a more in-depth article explaining how Brotli compares to other compression formats, Cloudflare did a great write-up. Essentially, Brotli has the potential to offer roughly 20-26% better compression ratios than Zopfli at comparable speeds, which is great news for those of us who care about performance.
How it Works With the Browser
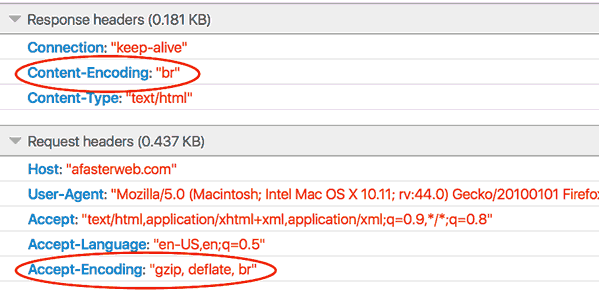
Whenever a browser makes a request to the server, it lets the server know what kind of compressed content it can decompress using the ‘Accept-Encoding’ header:
Accept-Encoding: "gzip, deflate"
Then, when the server responds with the content, it tells the the browser wwhat compression was actually used (if any) with the ‘Content-Encoding’ header.
Content-Encoding: "gzip"
In the case of browsers that support Brotli (e.g. Firefox), the Accept-Encoding header may look like this:
Accept-Encoding: "gzip, deflate, br"
And if the server is using the Brotli to compress the file it serves, it will use ‘br’ as the Content-Encoding response
Content-Encoding: "br"
Setting up the Server
As you can see, even if the browser can utilize Brotli, it does no good unless the server is also sending back files that are compressed with the algorithm.
Since my site is using Nginx as the web server, my goal was to configure Nginx to utilize Brotli. Google has already created a Brotli module for Nginx, which is the one I decided to use. This module actually has two different ways it can be used:
- A Filter module – used for compressing responses on-the-fly
- A Static module – used for serving pre-compressed files
Now, from everything I read, Brotli can be resource intensive, so I decided to set up my server to utilize it only to serve pre-compressed static content, and not try to do compression on-the-fly. That, and since this site only serves static files anyway, the Static module is the only one that I would actually need.
To make this work, I needed to 1) install Brotli on the server, so I could compress my static files using the algorithm; and 2) install the Brotli module into Nginx to serve this content. Here are the steps I took:
1. Enable HTTPS
Since the use of Brotli by the browser is restricted to HTTPS connections, the very first step is to make sure an SSL certificate is installed and that the site is set up to utilize HTTPS for its traffic. The steps involved here will vary from host to host , and I won’t get into the details of how to do this (If you’re looking for a certificate provider, don’t forget about Let’s Encrypt).
Once this is set up, we’ll need to get the proper files installed on the server.
2. Install Brotli on the server
Note: This was done on a Linux box, with Ubuntu 14.04 as the OS. In this example, the user will either need to be root, or have sudo permissions. We’ll be storing the code we download in the /opt/ directory.
To install Brotli, we’ll need to first install Python (in case it’s not already installed). We’ll also need the python-dev package
$ sudo apt-get install python2.7 python-dev
Now we’re going to create a folder to hold the Brotli codebase, and then compile it.
$ cd /opt
$ sudo git clone https://github.com/google/brotli.git
$ cd brotli
$ sudo python setup.py install
$ cd tests
$ sudo make
(note: the last command runs make in the necessary directories)
After these steps we now have a ‘bro’ executable in the brotli/tools/ directory. This can be used to compress files using Brotli. For instance, we could run the following command in one of our directories to compress the index.html file:
$ /opt/brotli/tools/bro --input index.html --output index.html.br
3. Install Brotli Wrapper
Next we’re going to instal Libbrotli, a wrapper for the Brotli codebase. This is necessary for the later module that we’re going to install.
$ cd /opt
$ sudo git clone https://github.com/bagder/libbrotli
$ cd libbrotli
$ sudo ./autogen.sh
$ sudo .configure
$ sudo make
$ sudo make install
4. Download Brotli Nginx Module
Finally, we’re going to set up the actual Nginx module
$ cd /opt
$ sudo git clone https://github.com/google/ngx_brotli
5. Recompile Nginx to Use Brotli Module
This gets the code for the module onto our machine. Now, in order to actually use the module, we’ll need to recompile Nginx with it added in. To do this, we’re going to download a copy of Nginx, compile it with this module, and then install it on the system.
$ sudo apt-get build-dep nginx
$ cd /opt
$ sudo mkdir nginx
$ cd nginx
$ sudo apt-get source nginx
This should create a nginx-1.x.x folder with the source code. Before compiling it, we’ll need to update the configuration file to make sure that it includes the ngx_brotli module.
$ cd nginx-1.x.x
$ vim debían/rules
In this file, there will be a number of blocks of code for various configurations (full, light, etc.). I updated the block for the “full” configuration, but you can update whichever type of installation you want to. To include the ngx_brotli module, find the lines in the appropriate block of code that start with
--add-module=…
and add
--add-module=/opt/ngx_brotli \
to the bottom of it. For example:
...
 config.status.full: config.env.full
    cd $(BUILDDIR_full) && ./configure  \
        $(common_configure_flags) \
        ...
        --add-module=$(MODULESDIR)/nginx-auth-pam \
        --add-module=$(MODULESDIR)/nginx-dav-ext-module \
        --add-module=$(MODULESDIR)/nginx-echo \
        --add-module=$(MODULESDIR)/nginx-upstream-fair \
        --add-module=$(MODULESDIR)/ngx_http_substitutions_filter_module \
        --add-module=/opt/ngx_brotli \
        >$@
    touch $@
 ...
Once this change has been made, we’re ready to compile and install.
$ sudo dpkg-buildpackage -b
6. Install Updated Nginx Build
Once you compile, and go to the parent directory, you should see a number of .deb files. Now we’re going to install them on the system. Notice that I’m using the “full” file since that’s the configuration block I added the module to.
$ cd ..
$ sudo dpkg -i nginx_*_all.deb nginx-full_*_amd64.deb
Note: It’s possible that you may receive an error due to conflicts with an existing package. For instance, I received a message saying there was a conflict with nginx-core. For me, I was able to resolved this by running $ apt-get remove nginx-core, and then running the above command again.
Once you’ve installed the updated version, you can confirm that the module actually was installed by running:
$ nginx -V
The end of the message should look something like this:
…–add-module=/opt/nginx/nginx-1.4.6/debian/modules/nginx-upstream-fair –add-module=/opt/nginx/nginx- .4.6/debian/modules/ngx_http_substitutions_filter_module –add-module=/opt/ngx_brotli
Notice that the last line has the ngx_brotli module we added to the configuration file.
7. Update Nginx Configuration
Now it’s time to update the Nginx configuration file to actually utilize this module we added. We do this by editing the nginx.conf file.
$ sudo vim /etc/nginx/nginx.conf
Under the ‘http’ block, add:
brotli_static on;
Once it’s added and saved, go ahead and restart nginx:
$ sudo service nginx restart
Compress the Assets
Now that we’ve set up the server to serve Brotli compressed files to browsers that can use them, we now need to actually generate the files that it will be sending. We do this by running the ‘bro’ executable we created earlier on the file(s) we want to convert.
In order to avoid doing this manually on a file by file basis, it’s possible to write a simple script to automate the process for you. For instance, the following line will recursivley loop through all the files in a given directory and compress any files that are .html, .css, or .js.
(replace ‘DIRECTORY’ with the name of the directory you want to loop through)
$ for x in `find DIRECTORY -type f -name '*.html' -o -name '*.css' -o -name '*.js'`; do /opt/brotli/tools/bro --input ${x} --force --output ${x}.br; done
Afterward, you may need to make sure these new files are readable.
$ chmod -R +r DIRECTORY
Automate the Process
This works, but ideally it would be something that happened automatically. Fortunately, this wasn’t too difficult to do with the set up that I’m currently using.
Right now, this site is using Jekyll to generate the files, and I’m using Git to store the version history. Whenever I make an update, I can push the new version to the master Git repo. At that point, there is a post receive hook that I already set up to recreate the site files and move them to the public website folder.
Since this post receive hook was already in place, it made the job of automatically recompressing the static files pretty simple. All I did was add the earlier lines to that post hook file (i.e. GIT_REPO/hooks/post-receive):
 ...
 for x in `find /var/www/WEBSITE_FOLDER -type f -name '*.html' -o -name '*.css' -o -name '*.js'`; do
      /opt/brotli/tools/bro --input ${x} --force --output ${x}.br;
 done

 chmod -R +r /var/www/WEBSITE_FOLDER
 ...
This can be adjusted as needed, but for me, it does the trick. Now, any time I push a change to my master repo, the files are compressed and moved over to the live web folder.
Test in the Browser
Now that we have our web pages compressed with Brotli, and the server set up to serve Brotli, it’s finally time to see if it’s working in the browser. Currently Firefox has it enabled for all users, and Chrome should be soon.
1. Disable CDN if Necessary
If you’re behind a CDN, you may need to disable it for testing. Some CDNs either don’t use Brotli, or only do so on files over a certain size. If the CDN is enabled for the files you’re trying to test, the files would be coming from the CDN’s servers, which means that the encoding would be up to them and their server configurations, not ours. Just something to take into consideration.
2. Inspect the Network Traffic
- In Firefox (and Chrome), go the page you want to test, right-click, and select ‘Inspect Element’.
- Now go to the ‘Network’ tab
- Click on the file you want to inspect, and you should see the ‘Response headers’ and ‘Request headers’ on either to the right or to the bottom.
- If everything is set up correctly, you should see ‘br’ among the ‘Accept-Encoding’ values AND as the value of ‘Content-Encoding’
Summary
After making the changes, I did see a slight improvement in some performance metrics (size of data transferred, Speed Index, etc.). The downside, though, is that currently I would also have to keep my CDN disabled to continue to serve Brotli compressed files. They do utilize Brotli, but only for certain files and sizes, and the assets I would be serving wouldn’t qualify. So although there was some improvement, right now the gains don’t outweigh the benefits of using the CDN. (I’m still keeping the post receive hook in place, though, so the compressed files will be updated automatically in case I ever need them.)
In the end, although I’m not serving Brotli files directly, I did end up learning a lot through the process. Overall, the process was fun, and hopefully what I’ve shared can be of help to those looking to tinker with Brotli and Nginx themselves.
Links
-
Brotli module for Nginx, Github repo for module
-
How To Add ngx_pagespeed to Nginx on Ubuntu 14.04 by Anatoliy Dimitrov, DigitalOcean This isn’t about the Brotli module specifically, but I found it helpful in learning how to compile a custom build of Nginx
-
Results of experimenting with Brotli for dynamic web content, by Vlad Krasnov, Cloudflare